Testing
Running Tests
Unit Tests
To run the unit tests use the following command in the root directory:
$ python3 -m pytest -m "not singularity" tests/unit
If a connection to a test server for Central EnteroBase can’t be reached use:
$ python3 -m pytest -m "not singularity and not centralEnterobase" tests/unit
Functional Tests
To run the functional tests use the following command in the root directory:
$ python3 -m pytest -m "not singularity" tests/functional
If a connection to a test server for Central EnteroBase can’t be reached use:
$ python3 -m pytest -m “not singularity and not centralEnterobase” tests/functional
Running Functional and Unit Tests
To run the functional tests with the unit tests use the following command in the root directory:
$ python3 -m pytest -m "not singularity" tests/unit test/functional
Integration Tests
Integration tests require you to be in the container to run and a valid connection to a test central enterobase server:
$ python3 -m pytest test/integration
Linting Code
To run the linter run the following command in the route directory:
$ flake8
Use black as the standard code formatter:
$ black <filename>
Running Assembly Tests
Assembly tests require a bit more setup to do. There is all the prerequisite of having a powerful enough system to generate the assembled files correctly (Alternatively have the assembled files ready and comment out the generation for testing purposes). It will be helpful to either have two terminals up at once or to use tmux. You will also have needed to setup local enterobase on your system first.
All assembly tests need to be run within the singularity shell as the EToKi environment is only accessible within the container. All tests that are required to be performed inside the container are marked with the singularity marker.
To run assembly tests using celery, a celery worker will also need to be set up.
The pipeline has been setup to ignore all singularity tests as it currently does not have the capabilities to test it properly.
Setup
To be able to perform the tests you need to perform the following steps:
Terminal 1
$ singularity shell -B /path/to/local_enterobase/dev/repo:/var/www/local_enterobase ~/local_enterobase_home/local_enterobase/EGP.sif
$ cd /var/www/local_enterobase
$ source /venvs/gunicorn-env/bin/activate
$ vim manage.py
Set STAGING = ‘testing’ in manage.py
Terminal 2
$ singularity shell -B /path/to/local_enterobase/dev/repo:/var/www/local_enterobase ~/local_enterobase_home/local_enterobase/EGP.sif
$ cd /var/www/local_enterobase
$ source /venvs/gunicorn-env/bin/activate
$ celery -A  manage worker  --loglevel=debug --pidfile=$HOME/celerybeat_myapp_2.pid
Terminal 1
$ python3 -m pytest -m “not fileIO”
$ python3 -m pytest -m “fileIO”
Note: the fileIO tests will delete the short reads and assembled files so please use with caution
Test-Driven Development
Test-Driven Development (TDD) is a style of programming which intertwines coding, testing (unit tests) and design (refactoring). When working on this project a TDD approach should be taken. The steps are as follows:
write a ‘single’ unit test to describe an aspect of the program
run the test, which should fail as the functionality has not been implemented yet
write ‘just enough’ code to make the test pass, as simple as possible
refactor the code so it passes all tests, contains no duplication, is minimal, and separates each area appropriately
repeat, accumulating unit tests over time
Avoid writing too many tests at once, try and focus on one test at a time, and make them narrow and fine-grained. There is also no need to write tests for trivial code (e.g. accessors)
Pytest
Pytest is the testing library used in this project. The pytest-flask library is also used to make setting up the test environment easier using pre-built fixtures.
Code Coverage
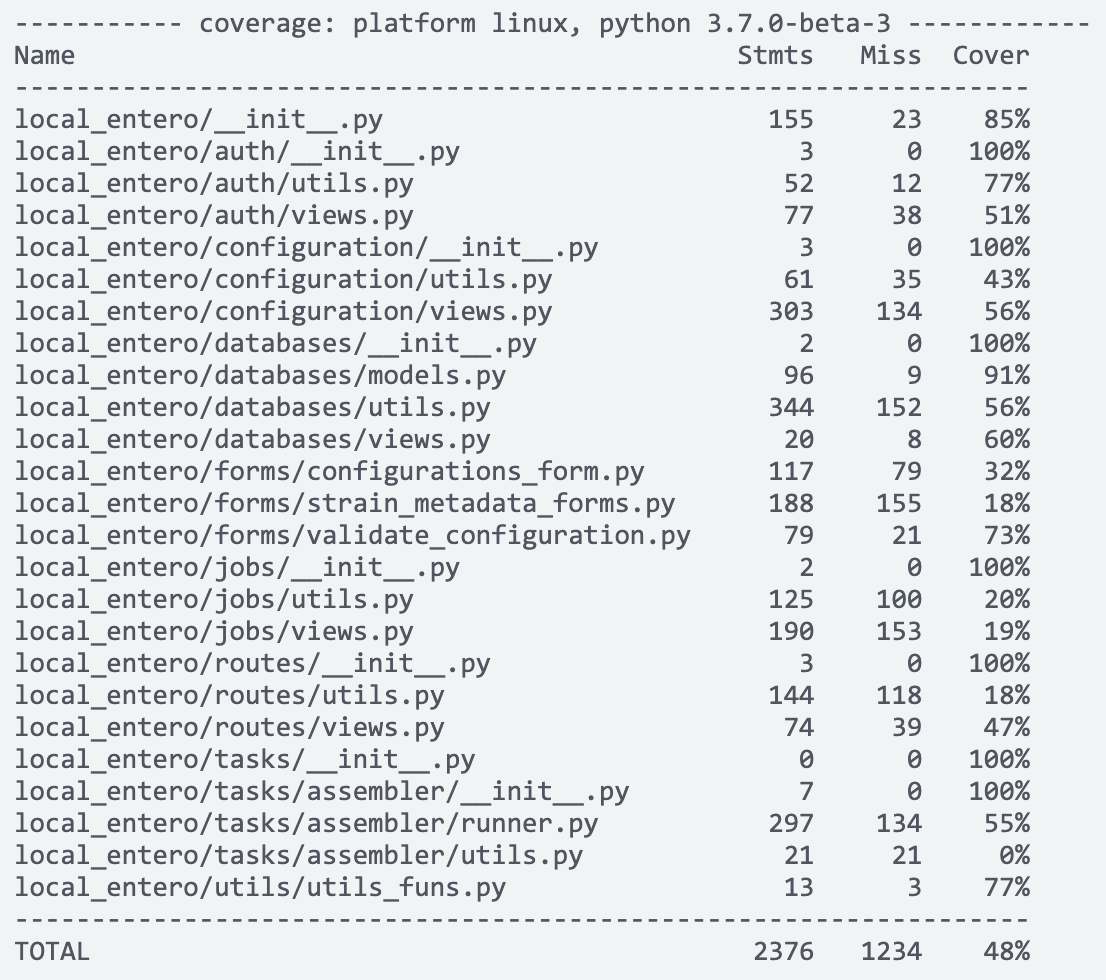
The aim is to have at least 80% code coverage with good unit tests. It is important not to pursue code coverage for the sake of code coverage. To check the code coverage, run the following command:
$ python3 -m pytest --cov=local_entero/ tests/integration/ tests/unit/ tests/functional/
You should get a similar table output to the command line:
Writing Unit Tests
Unit tests should be done to make sure code logic behaves as expected. All tests build off of the conftest.py file which contains a set of fixtures to create a FlaskClient for testing purposes. The client param should be used when testing other than when testing the config, in which cass the app param should be used.
When writing tests make sure to start the function name with "test" to make it discoverable to pytest.
Example:
import local_entero
from local_entero import db
from local_entero import mail
import pytest
...

def test_mail_can_be_sent_individual(client):
    with mail.record_messages() as outbox:
        mail.send_message(
            subject="testing",
            body="test",
            recipients=["dummy@email.com"],
            sender="dummy@sender.com",
        )
    assert len(outbox) == 1
    assert outbox[0].subject == "testing"
Above is an example of a unit test to check mail can be sent correctly. It makes use of components defined in the codebase to make sure they are defined correctly and are able to send out some mail. If it successfully does so the outbox should now contain one email.
Further example tests can be found in the tests/unit/ folder.
Writing Functional Tests
Functional tests should be done to make sure web pages behave as expected. Again, this uses the conftest.py file fixtures.
Example:
import pytest

def test_home_page(client):
    """
    GIVEN a Flask application
    WHEN the '/' page is requested (GET)
    THEN check the response is valid
    """
    res = client.get('/')
    assert res.status_code == 200
    assert b'Local EnteroBase' in res.data
The above example makes sure the home page loads correctly by testing the response to see if it contains the expected data and returns status code 200 (OK).
Further examples of functional tests can be seen in the tests/functional/ folder.
Writing Integration Tests
Integration tests should be written to tests multiple componenets are interacting together correctly. They can also be useful if some components do not make sense to test individually for a unit tests, e.g. sending a request to central enterobase to say it’s finished the upload test without having performed the upload test as this would always fail.
Example:
@pytest.mark.singularity
@pytest.mark.assembly
@pytest.mark.centralEnterobase
def test_assembly_test_integration(client):
    payload = {"test_token": "CpDUJCmZpO2J7Ii7GVcU5UUk"}
    res = client.post(
        url_for("config.download_assembly_test_files"), data=payload
    )
    res = client.post(url_for("config.run_assembly_test"), json=payload)
    assert res.status_code == 200
The above example performs an integration test for the assembly upload test. It has multiple markers allowing more granularity when performing tests. It makes calls to all the separate components necessary to perform the assembly file upload test.
Markers
Markers allow you to group tests together. These are the markers currently used in the codebase:
celery: mark a test as celery tests
assembly: mark a test as an assembly test w/o celery
fileIO: mark a test as making changes to the fileIO
singularity: mark a test as singularity only so its not run in pipeline
auth: mark a test as relating to authorisation (oauth)
centralEnterobase: mark a test for needing to communicate with central enterobase
If you would like to add another marker, add it to pytest.ini
Creating Markers
Markers are a useful tool in separating tests that interact with different components. For example, a marker has been made for tests that interact with celery workers, for tests that interact with Central Enterobase, fileIO, and so on. Any custom markers should be defined within pytest.ini.